Fishville Economics: Points, Experience & Levels Part 3

The traffic to my blog from my first two Fishville blog posts has been staggering. How can I resist? That’s right, it’s time for Yet Another Fishville Post (YAFP). Come on, you know you want to read more…

Screen shot 2009-11-12 at 12.57.13 AM

I’ve been a little surprised to see how few accurate blog posts exist out on the web that break down the profit & experience for Fishville.  For reference you can still find my first two blogs posts here:

Fortunately, I have found at least one new useful resource:

I’m at Level 42 in Fishville, so I can get almost all of the data myself.  However, I’m still missing the data for the last two fish:

  • Blueline Trigger
  • Longhorn Clownfish

If you have the data on either of these two fish, please post here in the comments.

In the past few weeks, Zynga has rolled out a number of new fish.  I’ve updated my Google Doc with all the updated numbers.

The most interesting addition has been a series of fish that you can only purchase with Sand Dollars, which is the Fishville denomination for game money that you have to buy with real money.

This poses a dilemma for my calculations, since I base profitability on coins spent to coins earned.  As a result, I needed a conversion ratio from Sand Dollars to Coins.  Although you can’t buy Sand Dollars with Coins, you can buy both with real US dollars ($) from Zynga with a scaling price table:

Dollars Coins Sand Dollars Coins / $ SD / $ Coins / SD
5 7500 25 1500 5 300.00
10 15800 55 1580 5.5 287.27
20 33300 115 1665 5.75 289.57
40 70600 240 1765 6 294.17

Notice anything strange?

According to this table, the ratio of coins to sand dollars varies between 300 and 287, and in a non-linear fashion.  It’s as if Zynga didn’t compare the volume discount on coins to the volume discount to sand dollars when they generated these prices.

Since it’s non-linear, I decided to take the “average” ratio as my conversion.  So, for the purposes of this blog post, one sand dollar = 292.75 coins.

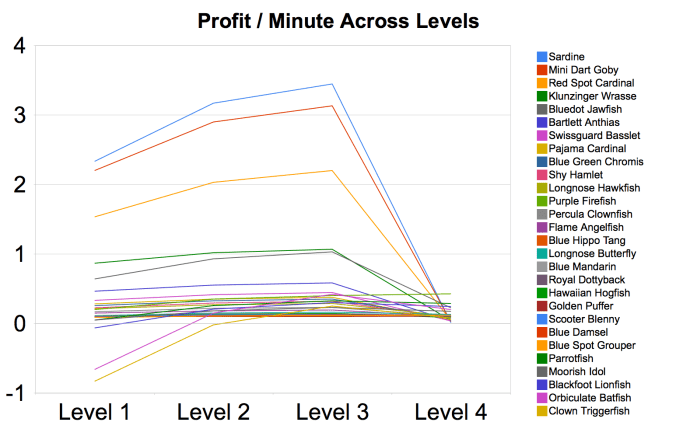
Using that ratio, I was able to regenerate my graphs.  Here is the graph showing profitability of each fish, per level.  All the assumptions from my second blog post still hold:

What you’ll notice is that some of the “sand dollar” fish are actually money losers for the first two levels.  That’s right, assuming my conversion ratio, you’d be better off just buying coins with your money, rather than buying sand dollars and then growing these fish!

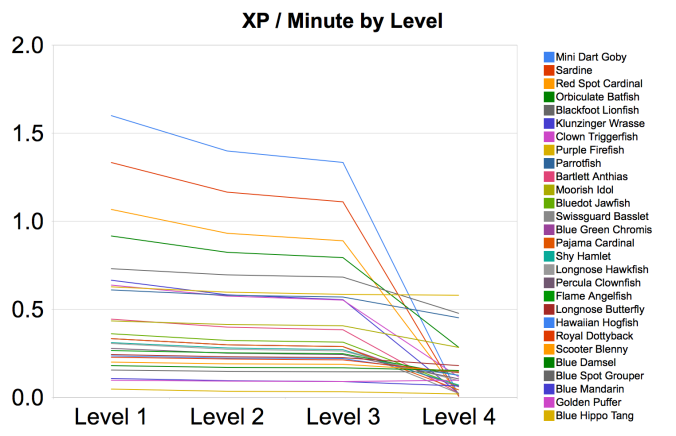
Now, the updated experience points chart tells a different tale:

In this case, you can clearly see that the best fish for experience, excluding the “fast fish”, are the sand dollar fish.  As a result, it’s pretty clear that what you are buying with your sand dollars is a fast path to rise up levels.  If you’re willing to spend the money on Batfish, you’ll be able to climb those levels quickly, and with much less work than minding 5 minute fish…

You can reference the full data in my Google Doc.  Let me know if you see any issues with the calculations.

For reference, I’ll include the Level 1 tables here, just in case there are issues reading the now huge Google Doc.

Profit per Fish when you harvest at Level 1:

Fish Profit / L1 Minutes / L1 Profit / Minute
Sardine 7.00 3 2.33
Mini Dart Goby 11.00 5 2.20
Red Spot Cardinal 23.00 15 1.53
Klunzinger Wrasse 26.00 30 0.87
Bluedot Jawfish 115.00 180 0.64
Bartlett Anthias 21.00 45 0.47
Swissguard Basslet 20.00 60 0.33
Pajama Cardinal 34.00 120 0.28
Blue Green Chromis 46.00 180 0.26
Shy Hamlet 54.00 240 0.23
Longnose Hawkfish 78.00 360 0.22
Purple Firefish 580.75 2880 0.20
Percula Clownfish 81.00 480 0.17
Flame Angelfish 89.00 600 0.15
Blue Hippo Tang 124.00 1080 0.11
Longnose Butterfly 165.00 1440 0.11
Blue Mandarin 125.00 1200 0.10
Royal Dottyback 99.00 960 0.10
Hawaiian Hogfish 72.00 720 0.10
Golden Puffer 423.00 4320 0.10
Scooter Blenny 133.00 1440 0.09
Blue Damsel 195.00 2160 0.09
Blue Spot Grouper 253.00 2880 0.09
Parrotfish 76.50 1440 0.05
Moorish Idol 53.25 1080 0.05
Blackfoot Lionfish -67.50 1080 -0.06
Orbiculate Batfish -238.50 360 -0.66
Clown Triggerfish -149.75 180 -0.83

Experience per Fish when you harvest at Level 1:

Fish XP / Egg XP / L1 Minutes / L1 XP / Minute
Mini Dart Goby 2 8 5 1.60
Sardine 1 4 3 1.33
Red Spot Cardinal 4 16 15 1.07
Orbiculate Batfish 66 330 360 0.92
Blackfoot Lionfish 79 790 1080 0.73
Klunzinger Wrasse 5 20 30 0.67
Clown Triggerfish 23 115 180 0.64
Purple Firefish 181 1810 2880 0.63
Parrotfish 88 880 1440 0.61
Bartlett Anthias 4 20 45 0.44
Moorish Idol 47 470 1080 0.44
Bluedot Jawfish 13 65 180 0.36
Swissguard Basslet 4 20 60 0.33
Pajama Cardinal 8 40 120 0.33
Blue Green Chromis 12 60 180 0.33
Shy Hamlet 15 75 240 0.31
Longnose Hawkfish 22 110 360 0.31
Percula Clownfish 26 134 480 0.28
Flame Angelfish 16 160 600 0.27
Longnose Butterfly 35 350 1440 0.24
Blue Hippo Tang 26 260 1080 0.24
Hawaiian Hogfish 17 170 720 0.24
Royal Dottyback 22 220 960 0.23
Scooter Blenny 29 290 1440 0.20
Blue Damsel 39 390 2160 0.18
Blue Spot Grouper 45 450 2880 0.16
Blue Mandarin 30 130 1200 0.11
Golden Puffer 42 420 4320 0.10

Enjoy.  Happy Holidays.

Fishville Economics: Points, Experience & Levels Part 2

The traffic to my blog from my first Fishville post has been staggering.  How can I resist?  That’s right, it’s time for Yet Another Fishville Post (YAFP).  Come on, you know you want to read more…

Screen shot 2009-11-12 at 12.57.13 AM

I’ve been a little surprised to see how few accurate blog posts exist out on the web that break down the profit & experience for Fishville.  Based on comments to my original post, I made some mistakes.  As a result, I’m posting this follow up to help address the most common concerns:

  • What about Level 5 (and 6 and 7…). I classify my charts based on the completion of levels, which is a little confusing because in Fishville, your fish is “Level 1” until it completes the level, and then it is Level 2, etc.  As a result, you don’t get the “Level 1” experience until your fish reaches Level 2.  Confusing.  Even more confusing, after completing Level 4, your fish can continue to go up levels… it just won’t be worth anything more.  As a result, I ignore all levels above 4.
  • Why doesn’t my experience number match yours? It’s because I’m including the experience you get from dropping the egg in the tank, not just the experience you get from harvesting.
  • Level 4 doesn’t take the same time as the other levels. Oops.  This is correct.  I still don’t have accurate info on whether the “Level 4” time is the same for all fish (2 days) or different.  For this post, I use the 2 day number, which changes the economics considerably.  (Hint: It’s not worth your time to ever let this happen)
  • Can you post a Google Doc of all your tables & charts? See the end of this post.  First time for everything.

To recap, here are the assumptions for my tables & charts:

  1. I assume harvesting & buying fish is instantaneous. Yes, I know its not.  Fodder for a future post.
  2. All profits are calculated per fish. Same with experience
  3. Total Experience = Experience from dropping egg + Experience from the level(s) of growth
  4. Total Profit = Revenue from harvesting the fist – Cost of the egg

In my last post, I described how your “profit per minute” increases with levels, but your “experience per minute” falls with levels.  A lot of people didn’t understand this, so I decided to try some charts to illustrate.

Here is a chart I made in Google Docs showing the effect of increasing levels on Profit / Minute.  Because there is a fixed cost to buying a new fish, the linear increase in profit per level helps your profit / minute.  Of course, it falls off a cliff once you hit Level 4, and it takes up to 2 days to complete.

Fishville Profit Per Minute Per Level

This means that, from a profit per minute perspective, it’s better to let your fish grow to complete Level 1, Level 2, and Level 3 before harvesting.

But there is a catch.  Because you get XP every time to buy an egg, the effect on experience points per minute is the opposite.  Every level you go, your experience points per minute drops!  See this chart to visualize:

Fishville XP Per Minute Per Level

Based on the comments to my original blog post, it’s very obvious that most players continue to ignore the experience points you get for dropping an egg in your tank – choosing instead to focus only on the experience points you get when you harvest the fish.  Big mistake, because this leads you to keep fish around too long.

Since my last post, I’ve also been able to complete my tables for all current fish.

Here is the profit table for Level 1 profits:

Fish Profit / L1 Minutes / L1 Profit / Minute
Sardine 7 3 2.33
Mini Dart Goby 11 5 2.2
Red Spot Cardinal 23 15 1.53
Inland Silverside 16 30 0.53
Bartlett Anthias 21 45 0.47
Swissguard Basslet 17 60 0.28
Pajama Cardinal 34 120 0.28
Blue Green Chromis 46 180 0.26
Shy Hamlet 54 240 0.23
Longnose Hawkfish 78 360 0.22
Percula Clownfish 81 480 0.17
Annularis Angelfish 89 600 0.15
Blue Hippo Tang 124 1080 0.11
Royal Dottyback 99 960 0.1
Hawaiian Hogfish 72 720 0.1
Scooter Blenny 133 1440 0.09
Blue Damsel 195 2160 0.09

Here is the experience table for Level 1 experience.  Note that I included the experience you get for dropping the egg, as well as the total experience you get for completing level 1.  Remember, Total = Dropping Egg + Level XP:

Fish XP / Egg XP / L1 Minutes / L1 XP / Minute
Mini Dart Goby 2 8 5 1.6
Sardine 1 4 3 1.33
Red Spot Cardinal 4 16 15 1.07
Inland Silverside 4 16 30 0.53
Bartlett Anthias 4 20 45 0.44
Swissguard Basslet 4 20 60 0.33
Pajama Cardinal 8 40 120 0.33
Blue Green Chromis 12 60 180 0.33
Shy Hamlet 15 75 240 0.31
Longnose Hawkfish 22 110 360 0.31
Percula Clownfish 27 135 480 0.28
Annularis Angelfish 16 160 600 0.27
Hawaiian Hogfish 17 170 720 0.24
Royal Dottyback 22 220 960 0.23
Scooter Blenny 29 290 1440 0.2
Blue Damsel 39 390 2160 0.18
Blue Hippo Tang 26 52 1080 0.05

As promised, here is a link to the Google Doc with all my tables and charts.  Please post additional info, corrections, or data in the comments below.

Updates:  I’ve now posted additional columns on Fishville:

Fishville Economics: Points, Experience & Levels

My Zynga addiction clearly knows no bounds.  Last week, Zynga launched a new game called Fishville, and clearly at this point I have no ability to resist any new Zynga game.

Screen shot 2009-11-12 at 12.57.13 AMFishville has a deceptively simple frame:  you have a fish tank, and you buy fish eggs for it.  The fish hatch, you feed them, and then when they are fully grown, you sell them for profit.

What I’ve found most interesting about the game is the new dimensions they are exploring in the economics of the game.  Fishville adds a couple distinguishing twists versus Farmville or Café World:

  1. Multiple Tanks. How many people wish they had more than one farm in Farmville?  In Fishville, Zynga has two types of expansion – the ability to put more fish in a single tank and the ability to buy new tanks.  This may not seem relevant from a structural standpoint – after all whether you add 20 fish to one tank or 10 to 2 tanks shouldn’t matter – but it should create a new dynamic around buying virtual goods to decorate different tanks.
  2. Harvest Levels. This is the real twist to the economics.  Fish grow up in stages, up to four levels.  The revenue in coins and the experience you get goes up linearly with each level.  So if you have a 4 hour fish, you can harvest them at 4 hours at Level 1, or 16 hours at Level 4.  You still have to feed them or they die (similar to withering crops in Farmville), but you don’t need to “replant”.

The Harvest Levels have the most impact on the game economics.  In financial terms, each fish now has a fixed cost and a variable cost, as well as a fixed experience pay-off and variable experience pay-off.

For example, let’s take the Mini Dart Goby, the first fish.

The Goby costs 7 coins for an egg.  That’s a fixed cost.  If you grow it to Level 1, you’ll get 18 coins, for a profit of 11 coins.  Easy, right?  Hold on.  If you wait until Level 4, you’ll get 72 coins over that same 7 coin cost, for a profit of 65 coins.

The fixed cost means that your “profitability” or “profit / minute” goes up the longer you wait to harvest.

Seems like a no-brainer to wait until Level 4?  Not so fast.

With Experience Points, the math works in reverse.

The Mini Dart Goby gives you 2 XP for dropping the egg.  At Level 1, you’ll get 8 XP, for a total of 10 XP.  But if you wait until Level 4, you’ll get 32 XP, for a total of 34 XP of the time period.  In this case, your “XP / Minute” goes down the longer you wait to harvest.

It gets even harder.

You can harvest a fish in-between levels… but you don’t get any credit for the time between levels.  So if you are half-way between levels, your “profit / minute” and “experience / minute” will be terrible.  In fact, the math says you need to harvest at level boundaries pretty closely.  (I think in a future blog post, I’ll graph this.)

For now, here are some tables I’ve made for the fish I have data on.  Unfortunately, this game is so new, I can’t find any guides online with data for all fish.  Special thanks to Erin Hoffmann, who serves as both data provider and my toughest competitor in Fishville.

The most interesting aspect to these tables is that while the profitability / minute rises for each level, Zynga has kept the fixed costs proportional enough that the ranking of the fish does not change significantly between 1 level or 4 levels.

Here is the profitability of different fish at Level 1:

Fish Profit / One Level Minutes / One Level Profit / Minute
Sardine 7.00 3.00 2.33
Mini Dart Goby 11.00 5.00 2.20
Red Spot Cardinal 23.00 15.00 1.53
Swissguard Basslet 17.00 60.00 0.28
Shy Hamlet 54.00 240.00 0.23
Percula Clownfish 81.00 480.00 0.17
Royal Dottyback 99.00 960.00 0.10
Hawaiian Hogfish 72.00 720.00 0.10
Scooter Blenny 133.00 1440.00 0.09

Here is the profitability of different fish at Level 4:

Fish Profit / Four Levels Minutes / Four Levels Profit / Minute
Sardine 43.00 12.00 3.58
Mini Dart Goby 65.00 20.00 3.25
Red Spot Cardinal 137.00 60.00 2.28
Swissguard Basslet 98.00 240.00 0.41
Shy Hamlet 321.00 960.00 0.33
Percula Clownfish 468.00 1920.00 0.24
Hawaiian Hogfish 432.00 2880.00 0.15
Royal Dottyback 567.00 3840.00 0.15
Scooter Blenny 796.00 5760.00 0.14

Here is the experience productivity of different fish at Level 1:

Fish XP / One Level Min / Four Levels XP / Minute
Mini Dart Goby 8.00 5.00 1.60
Sardine 4.00 3.00 1.33
Red Spot Cardinal 16.00 15.00 1.07
Swissguard Basslet 20.00 60.00 0.33
Shy Hamlet 75.00 240.00 0.31
Percula Clownfish 135.00 480.00 0.28
Hawaiian Hogfish 170.00 720.00 0.24
Royal Dottyback 220.00 960.00 0.23
Scooter Blenny 290.00 1440.00 0.20

Here is the experience productivity of different fish at Level 4:

Fish XP / Four Levels Min / Four Levels XP / Minute
Mini Dart Goby 26.00 20.00 1.30
Sardine 13.00 12.00 1.08
Red Spot Cardinal 52.00 60.00 0.87
Swissguard Basslet 68.00 240.00 0.28
Shy Hamlet 255.00 960.00 0.27
Percula Clownfish 459.00 1920.00 0.24
Hawaiian Hogfish 629.00 2880.00 0.22
Royal Dottyback 814.00 3840.00 0.21
Scooter Blenny 1073.00 5760.00 0.19

If you’d like to help, I’m missing data for the following fish:

  • Blue Damsel
  • Inland Silverside
  • Pajama Cardinal
  • Longnose Hawkfish
  • Annularis Angelfish
  • Blue Spot Grouper
  • Blue Hippo Tang
  • Bartlett Anthias

For each, please leave a comment with:

  • XP / Egg
  • Revenue / Level
  • XP / Level
  • Minutes / Level

Hope this helps the new Fishville players out there.  Enjoy.

Update (11/14/2009): New blog post coming tomorrow, with updated tables and new info.  Also, fixing the issue around the whole “Level 4/Adult” confusion, and publishing a Google Doc to help others benefit from the raw data.  I’m still finding that people are ignoring the XP from the dropping of the egg, and only focusing on the XP from harvesting, so I’ll update tables to make that more clear.

Updates:  I’ve now posted additional columns on Fishville: